Thursday, April 29, 2010

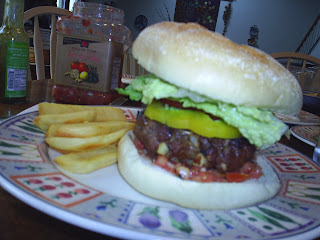
Taco Burgers

Today's post is inspired by another incredibly picturesque recipe featured on Closet Cooking. For the original recipe, click here: http://closetcooking.blogspot.com/2009/08/taco-burger.html

The taco burger is another instance of good plus good equals gooder. Who doesn't love tacos and burgers anyway? Frankly, I'm surprised that I've gone twenty+ years on this planet without previously seeing a taco burger (in real life or, at least, in my dreams).

Ingredients:
1 lb Ground Beef
1 Packet of Taco Seasoning
1/2 Large Onion
Cheese
Buns
Salsa
1 Avocado
1 Bell Pepper
2 Tomatoes
Lettuce

Steps/Analysis:
Place your beef (85% meat to 15% fat, I find, works best) in a large bowl. Dice the onion as small as you can manage and add it to the meat. Essentially, the taco seasoning is going to take the place of any other seasoning that you might add to a normal burger, so dump that in as well and get your hands in there. Mix to thoroughly combine everything.

Next, grab about a quarter of the meat (about one large handful) and form into a patty. Repeat three more times and lay them out on a plate. Use your thumb to indent the center of each patty so they don't swell up like giant meatballs on the grill.

Speaking of the grill, fire that sucker up on medium to medium-high heat. If you don't have a grill available, I'm sure a large pan on the stove top will work just as well. Lay the patties down and use the next 3-5 minutes to wash your hands and address your fixings.

The standard lettuce and tomato felt appropriate to me. To go along with the taco theme, though, I also opted for salsa, bell pepper, and avocado. Slice all the veggies as thin as you can manage and arrange the toppings on plates. If you have a lemon handy, you may want to squeeze a little juice over the avocado to prevent browning. If you don't, wait until just before serving to slice.

Be careful not to neglect your burgers. Flip them and let cook for another 3-5 minutes. My rule of thumb is if I can press down on them and only clear juice runs out (no red) they're done. When you're at that point, or close to it, throw on your cheese and any buns or toppings you'd like toasted. I went with the omnipresent Mexican Blend shredded cheese, but you could use just about anything.

When the cheese is melted, you're done!


Serving/Notes:
Some nice, sturdy steak fries go well with these burgers. Mine turned out absolutely massive and incredibly filling. Be careful how you arrange your toppings, though. Putting the salsa directly against the bun will cause it to become soggy long before you're finished eating. Structural integrity is key when it comes to homemade burgers, so a barrier of lettuce would serve you well.

I found the taco flavor was subtler than I thought it would be. I might try a higher ratio of seasoning in the future.

Tuesday, April 27, 2010

Pizza Chronicles: Buffalo Chicken

Since it seems like the majority of my most successful meals occur on top of pizza crust, I thought it might be worthwhile to group these recipes together under a single heading. It also occurs to me that these dinners are most in line with the B.A. Gourmet mentality: feeding college students. To that end, I envision a long line of experimental pizzas in the future. I've already got a few ideas kicking around in my head, but for now let's focus on the dish at hand, buffalo chicken pizza.


Ingredients:
1 Boboli Pizza Crust
1 Package of Purdue Short-Cuts Chicken Breast
2 Stalks of Celery
1/4-1/2 Small Onion
1/4-1/2 Bell Pepper
Shredded Cheese (Mexican Blend)
1/4 Cup of Hot Sauce*
2 Tablespoons of Butter*

Steps/Analysis:
As you can see just from the ingredients list, this recipe is going to have a lot in common with the BBQ chicken pizza I showed you last week. I'm okay with that because the flavors are distinct enough and the two actually compliment each other well when placed on the same table.

At any rate, loyal readers will already be familiar with the first couple steps, making this an especially easy transition to a new meal. Set the oven to 415 degrees and put the bare crust in for about 10 minutes to crisp up.

Dice the onion and pepper and thinly slice the celery stalks. Start all three sauteing over medium heat with a little oil. I like celery in this recipe for a couple reasons. First, it's thematically appropriate to the buffalo chicken theme. Secondly, and, I think, more importantly, celery stands up to heat a lot better than onions or peppers and will retain a lot of its crunch throughout the cooking process. The end result is a pleasing contrast in textures when incorporated with the chicken and cheese.

Next, get to work on the buffalo sauce. In it's essence, buffalo sauce is incredibly simple - butter and hot sauce, melted and mixed together. Use a large, microwave-safe bowl and nuke the two together for a minute or so. I usually eyeball the measurements and adjust the ratio as I see fit during the process, so my buffalo sauce never comes out exactly the same (hence the * in the ingredient list). It's hard to imagine what one would have to do to screw the sauce up, but even if you do it's easy enough to throw together a new batch.


Dump your chicken into the sauce bowl and mix to evenly coat. At this point, the crust should be ready so spread the chicken over it in a single layer. Then, spread the onion/pepper/celery combo on top of that and cover with the shredded cheese.

Place the pie back in the oven for 10-15 minutes, or until the cheese is melted.

Serving/Notes:
Again, it would serve you best to wait a few minutes before cutting into this pizza so everything has a chance to come together and settle.

I'm not a big fan of bleau cheese, but a little bleu cheese salad dressing for topping/dipping is entirely appropriate.

Friday, April 23, 2010

B.A. Gourmet Favorite: BBQ Chicken Pizza

This is the recipe that started it all, the first thing I ever learned to cook for myself in college. I really believe that it's the perfect student meal, based on three outstanding principles. First, it's incredibly easy to make. The ingredient list is minimal and everything is pre-cooked. Second, it's quick. After the first couple times you make it, the entire process shouldn't take much longer than 20 minutes. Third, it's pizza!

BBQ chicken pizza has been a hit with everyone I've made it for. My former roommates have often requested it and gone as far as to purchase the supplies for it. If you are currently in college, do yourself a favor and make this tonight. You won't be disappointed.
Ingredients:
1 Boboli Pizza Crust
1 Package of Purdue Short-Cuts Chicken Breast
Sweet Baby Ray's BBQ Sauce (There's really no reason to ever buy any other brand, trust me)
Shredded Cheese (Mexican Blend)
Optional:
1/4 of an Onion
Small Handful of Sliced Button Mushrooms
Steps/Analysis:
The bare bones recipe is delicious by itself, so, by all means, ignore the onion and mushrooms if you're just getting a handle on the pizza or if you're exceptionally pressed for time. I find, though, that their inclusion really bumps the dish up to a whole different level.
Preheat your oven to 415 degrees. I like to prep the pizza crust by putting it in the oven by itself for about ten minutes. That's going to crisp it up a little bit and make it a firmer foundation for a pile of barbecue goodness to rest upon.
Dice the onion and give the mushrooms a rough chop. Saute together in a little olive oil until the onions are a golden brown and set aside.
In a bowl, deposit your chicken and douse it with the Sweet Baby Ray's. Mix with a fork until each piece has a nice layer of sauce. (When you get good enough, I've found it's actually possible to complete this step right on the pizza crust, so you won't even have to clean a bowl afterwards.)
You can spread the chicken over the crust at this point, but I like to add a base coat of barbecue sauce first. There's no reason to skimp. With your chicken in place, you can spoon the onions and mushrooms on top and then cover everything with fistfuls of shredded cheese.
Place the pizza on a baking dish or pizza stone and return to the oven for 10-15 minutes or until the cheese is nice and melty.
Serving/Notes:
Fight the urge to immediately cut the pie into slices. If you wait a few minutes for everything to set up, the process is going to be much easier and less messy. I like a little hot sauce on my slice, but that's true of just about everything I cook, so suit yourself.
This dish reheats incredibly well the next day, too. As a matter of fact, I think it's pretty tasty cold, out of the fridge as a midnight snack. There's no bad way or time to eat it.
Once you have this basic recipe down, it's easy to play around with it and make all kinds of interesting pizzas. You might remember the Mexican Pizza I wrote about some weeks ago. I've also done a Buffalo chicken pizza that rocks my socks off. I plan on sharing that gem with you next week.

Wednesday, April 21, 2010

B.A. Breakfast: Guacamole Omelettes

Mmmmm, breakfast! Almost certainly my favorite meal of the day and the first thing I ever became proficient in cooking. A good breakfast needs a little time to come together. A quick bowl of cereal may suffice Monday through Friday, but when I roll out of bed around 11 or so on a Sunday morning, I need something a little more substantial.

Today's recipe is inspired by another blog that I've become familiar with just recently: http://closetcooking.blogspot.com
This guy's a little out of my league when it comes to cuisine, but I get the feeling he's had a lot more time to practice the craft. His blog also contains some of the best looking pictures of food I've ever seen. It's definitely worth a look.
When I saw Closet Cooking's guacamole omelette (http://closetcooking.blogspot.com/2010/03/guacamole-omelette-with-salsa.html) I knew it was something I had to try. Guacamole? good. Omelette? Good. Guacamole omelette? Awesome.
Ingredients:
2 Eggs
Guacamole*
Salsa
Shredded Cheese (a Mexican blend, preferably)
1/2 Small Onion
1/2 Bell Pepper
Salt and Pepper
Steps/Analysis:
This is pretty simple as far as egg dishes are concerned. First, dice the onion and bell pepper and lightly saute over medium heat. When they're just browned, add a pat of butter to the pan and swirl around for even coverage. Reduce the heat to low.
Crack and beat the eggs in a bowl, adding salt and pepper. Gently pour into the pan. Resist the urge to play around with the eggs until they've started to set up and there's just a little liquid resting on top. At that point, slide a spatula under the omelette-in-the-making and give the pan a little jiggle so you know you'll be able to plate and fold the finished piece easily.
Sprinkle some cheese over the eggs and spread a healthy glob of guac goodness over one half (ideally the half directly opposite of the pan's handle, trust me).
Take the pan off of the heat and position over your plate. Start shimmying the egg off, but don't lose control over it. Use the lip of the pan to fold your omelette neatly in half.
Serving/Notes:
I recommend you spoon some salsa over the top of the omelette and add a dollop of guacamole on top for some more color. Chips or toast make a fine accompaniment.
Try to avoid overstuffing the omelette, if you can. The egg isn't dominant enough to take control of the dish and if you tip the balance too far, it can be like eating a big plate of guacamole - not a terrible thing, but not really what we're going for here.
*Why not use The B.A. Gourmet's spruced up guac? What? You don't have the recipe handy? Alright, here you go: http://thebagourmet.blogspot.com/2010/01/spruced-up-guacamole.html

Wednesday, April 14, 2010

Chicken Orzo Frattata

This week's post features I recipe I discovered while watching Everyday Italian with Giada De Laurentiis. If you're a college-age male having trouble getting into Food Network programming, I highly recommend this show. Even if you're not into a particular episode's dish, Giada's not too hard on the eyes.


At any rate, chicken orzo frittata incorporates chicken breast and pasta into eggs, making a far more substantial dish than you may think a frittata is capable of. It's quite enough to satisfy even the heartiest of appetites come dinner time. For Giada's original recipe, click here: http://www.foodnetwork.com/recipes/giada-de-laurentiis/chicken-and-orzo-frittata-recipe/index.html

My own attempt varies slightly, though I imagine the end product is largely the same.

Ingredients:
7 Eggs
2 Chicken Breasts
3/4 Cup Orzo Pasta
1/2 Cup Ricotta Cheese
4-8 Scallions
1/3 Cup Roasted Red Peppers
Italian (Flat Leaf) Parsley

Steps/Analysis:
Giada starts off with a pre-roasted chicken. To save a couple bucks, I bought two raw chicken breasts and decided to cook them myself. Trim the breasts of fat and cut in fairly identical strips (roughly the size of a large chicken tender). Place these in a roasting pan that's been hit with a little spray oil and salt and pepper liberally. Cook the breasts in a 375 degree oven for approximately 20 minutes, or until they are white all the way through.
The next item that should be addressed immediately for time is the orzo. There's no big secret to boiling pasta, fortunately. If you follow the directions on the box you should be fine. Don't be afraid to estimate the amount either - that's what I did because I didn't feel like doing much math.
Chop the scallions into small pieces and dice the roasted peppers to approximately the same size. Give the parsley a rough chop. Combine these ingredients in a large mixing bowl with the eggs and ricotta. (Note: Giada's recipe also calls from creme fraiche, but I couldn't find any at my supermarket, so I just increased the cheese ratio to make up for it.)
Drain your pasta and run it under cold water for a minute or two. Cut the chicken into bite-size pieces and allow to cool on a plate for some time. Neither of these ingredients should be hot; if they are, they'll start to curdle the eggs immediately after being introduced to the bowl.
Uniformly incorporate the last ingredients into the egg mixture and pour into a pie pan or baking dish. Place the dish in your 375 degree oven for approximately 35 minutes. (Note: for some reason, Giada's timing seemed to be very off on this step. I found myself taking the pan out, jiggling it, and putting it right back in the oven more than once.) Basically, you want the egg to be firmly set. If it seems a little liquidy it's probably still okay to pull the pan because carry over heat and evaporation will take care of it.
Serving/Notes:
Overall, a very hearty dish. Two slices had me feeling a little uncomfortably full. In hindsight, I would advise you to go easy on the parsley and be sure to chop it thoroughly. Big chunks of it are going to be a little unpleasant to the palate. Other than that, there's not much to it. Salt and pepper to taste and be careful not to burn your mouth.

Wednesday, April 7, 2010

B.A. Gourmet VS Salmon Cakes

Gather 'round, Gourmet-niacs. Have I got a harrowing story of culinary heroics for you today!


I've been meaning to try a fish dish for some time now: nothing fancy or potentially deadly, but definitely something from the sea. In my constant search for inspiration, I came across a recipe for salmon cakes that intrigued me. It seemed easy enough, had a relatively short list of ingredients, and promised success. Even better, it called for pre-packaged salmon (a la cans or packets of tuna fish), so the entire ordeal would be more a matter of heating than cooking. It seemed foolproof.

And that is where our tale begins...

Ingredients:
24 Ounces of Pre-Packaged Salmon (Cans or Packets)
1/2 Cup of Scallions
5 Tablespoons of Mayonnaise
5 Tablespoons of Mustard
2 Tablespoons of Capers
Parsley

Steps/Analysis:
The recipe I consulted guaranteed that, even though there were no bread crumbs or other binding agents involved, the mayo and mustard would be more than enough to hold the moist fish together. It also advised cooking the cakes in the oven, but that seemed a little off to me. I didn't want to dry out the cakes and I also wanted a little bit of a crust on them, so I opted to take the whole operation to the stove top.

In a large mixing bowl, combine the fish, capers, and wet ingredients. Finely chop the scallions and parsley and add them to the mixture. Stir to thoroughly incorporate.

Set a large, heavy pan over Medium-High heat. Add just enough olive oil to coat the bottom of the pan and allow it to heat up.

Using your hands, form patties from your fish mixture and carefully arrange them around the pan. Do not overcrowd the pan because you will need to flip them.

... and that's where the trouble arose: flipping. My salmon cakes were getting nice and brown on their bottoms, but would disintegrate as soon as I touched them with the spatula. I had been deceived! Very quickly, I had a pan full of half-cooked salmon salad that did not look particularly appetizing.

Sweat beaded on my forehead as I pondered my options: trash the failed cakes and order a pizza or improvise! Refusing to admit defeat so soon, I killed the heat and punched the reset button!


Additional Ingredients:
3-4 Eggs

Improvised Steps/Analysis:

I calmed myself down and spread the failed cakes out on a plate to cool. I carefully and slowly stirred them back into the cold mixture. This required 3 or 4 installments because I wanted to lower the temperature of the semi-cooked fish, not dramatically raise the temperature of the cold fish.

Then, I cracked three eggs into the bowl and went to town on it with my spoon. That seemed to be the correct amount for my purposes, but I think I could have easily added another egg for an even more cohesive end product.

If you're following along, I suggest you forget about using your hands to form the patties at this point. Instead, grab a large ice cream scoop. This will create a smaller, better proportioned salmon cake that will be easier to maneuver around the pan.

Scoop out four cakes into your reheated pan and resist the urge to flatten them out. The more height they have, initially at least, will help them firm up as the first side cooks. Don't worry, it'll become a serviceable patty when flipped.

On the subject of flipping, treat these salmon cakes like hamburgers: only flip them once! The less you move them, the better they will hold together. Cook each side for 2-5 minutes and remove to a platter. Repeat until the mixing bowl is empty.

Serving/Notes:
I ended up with about a dozen cakes (minus the one I ate during cooking for quality control purposes). They came out tender, flaky, and pretty tasty; in terms of flavor and texture, they were reminiscent of crab cakes. The mustard and capers give the fish a nice little zing that I appreciated. Slice up a little lemon to squeeze over top and enjoy.

I paired the entree with mashed potatoes and mixed vegetables (of the instant and frozen varieties, respectively), which complemented the salmon cakes well.

Considering the abject terror I experienced during the cooking process, I was very happy with the meal. The recipe can only be easier to execute in the future.

Gourmet Counter