Showing posts with label chicken. Show all posts

Monday, October 18, 2010

Pesto Chicken Pizza

So, a high class meal is nice, but let's get back to what this blog is really all about: PIZZA!
After last week's dinner, I had lots of pesto and chicken left over. As fate would have it, there was also an extra pizza crust in my fridge, just waiting to fulfill its destiny as a conveyance of deliciousness.

Thus was born the Pesto Chicken Pizza.


Ingredients:
1 Pizza Crust
2 Cooked Chicken Breasts
Jarred Pesto
Grape or Cherry Tomatoes
Shredded Cheese

Steps/Analysis:
Preheat the oven to 415 degrees and lay the pizza crust out on a baking sheet. Then, spoon on a thin layer of pesto.

(Again, I'm using chicken breasts that I had already cooked and prepared for the week. If you haven't planned accordingly, residence in a 375 degree oven for about 35 minutes will get you where you need to be.)

Cut the chicken into roughly bite-size pieces and distribute them evenly over the pizza. Cut your tomatoes in half (or into smaller pieces if necessary) and repeat.
Sprinkle a layer of cheese over everything. Now, based on the nature and genre of the meal, logic dictates that you should definitely mozzarella cheese if you have it. I only had my usual Mexican blend on hand. Necessity being the mother of invention, I went for it and never looked back.

The final step is to brush a little olive oil around the outer crust so that it crisps up nicely in the oven.

10-15 minutes and you've got yourself dinner!


Serving/Notes:
You may want a little salt and pepper, but otherwise I was very happy with this creation. I've got a pretty solid repertoire of pizzas, if I do say so myself, and this is a nice addition to it.

The use of Mexican rather than Italian cheese seemed negligible. The substitution certainly didn't ruin my evening.

Monday, October 11, 2010

Chicken Pesto Supreme

I realize that a lot of my posts so far this fall have been a little too 'Freshman' and not 'Graduate' enough in complexity or class. Salami's great and all, but it really shouldn't be the focal point of one's diet.

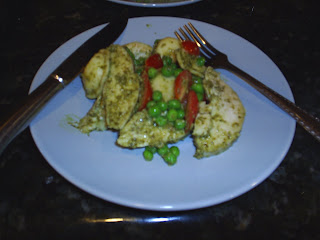
With that in mind, I offer you a nice little dish I'm going to call Chicken Pesto Supreme. It's a little meaty and a little cheesy. It's got starches and vegetables. What more could you want?

Ingredients:
2 Cooked Chicken Breasts
Frozen Cheese Ravioli
Frozen Peas
Cherry or Grape Tomatoes
Jarred Pesto


Steps/Analysis:
I cooked my chicken breasts in advance--I like to bake a bunch of them at a time and keep them on hand for meals throughout the week. If you haven't, though, no big deal. Trim their fat and salt and pepper them generously. Place them in an oiled baking dish and get them in a 375 degree oven for about 35 minutes.

With your chicken taken care of, set a pot of water over high heat and get it to boiling. When it's there, salt the water and carefully pour in enough ravioli for two people.

Keep an eye on that pasta! Depending on the brand you buy, it should only take about 5 minutes to cook through.

In the meantime, get the frozen peas in a large bowl with just a little water and microwave for 2 minutes or so. Halfway through, you'll want to give the peas a stir.

Drain off the water from the greens when done.

Next, slice a handful of tomatoes in half and add them to the peas. (Hopefully, you've selected a bowl large enough to house and serve the entire meal. If not, you may want to consider making a switch now.)

Drain the ravioli and give your chicken breasts a rough slicing. Add them to the bowl as well.
Finally, spoon on a healthy amount of basil pesto and stir to coat everything nicely. Just be careful not to be too vigorous about it; you don't want broken ravioli.

Serving/Notes:
A little salt and pepper are all that you need to accompany this meal... maybe a hank of bread, but not much else. Make sure you get a little of everything on your plate. The flavors and textures all play nicely with one another and the more variety you get on your fork, the happier you'll be. Enjoy, this classy, date-night dinner.

Wednesday, May 26, 2010

Maple/Mustard Glazed Chicken

This week's recipe is inspired by a meal I saw on http://closetcooking.blogspot.com/ . Having said that, I think enough alterations were made to the original that I have to take the credit/blame for this one. Some of these changes were made out of laziness on my part, some were a result of necessary improvisation.


Maple/Mustard Glazed Chicken was not a rousing success, but neither do I believe it to be a lost cause. It's got potential.

Ingredients:
4-6 Chicken Breasts
8 Tablespoons of Maple Syrup
1 Cup of Dijon Mustard
4 Tablespoons of Brown Sugar
1 Teaspoon of Thyme
2 Eggs
Flour
Bread Crumbs/Oatmeal (explanation forthcoming, I promise)


Steps/Analysis:
Preheat the oven to 400 degrees. Combine the maple syrup, mustard, brown sugar, and thyme in a bowl and stir to combine.

Fill three shallow bowls separately with flour, the beaten eggs, and a bread crumb/oatmeal mixture.

Now, before I had gone grocery shopping for this meal, I checked the refrigerator and pantry for items I already had at hand. I saw a canister of bread crumbs and happily checked it off of my list. However, when it came time to cook, I discovered that the container was practically empty. I searched for a new one to no avail. I saw the oatmeal and thought I remembered reading about meats crusted in oatmeal before, so I augmented my bread crumb supply with it. I don't necessarily recommend this, but it seemed to work out well enough.

Trim any excess fat off of the chicken breasts and cut into single portions. Set a large pan over Medium-High heat and pour in enough oil to coat the bottom.

Dredge your breasts in the flour first, then the egg, and, finally, the bread crumbs/oatmeal and place directly in the pan. Get a nice, brown crust on both sides, but don't worry about cooking each breast through. Once you have the crust, remove the chicken to a lubricated baking dish.

When all of the chicken is in the baking dish, pour on the glaze evenly and place it in the oven for about 10 minutes to finish cooking.

Serving/Notes:
The maple syrup/mustard mixture ended up being less a glaze than a thick, heavy, smothering blanket. We all ended up scraping most of it off on our plates. The flavors were nice, though a little heavy on the mustard. I would try to balance the sweetness better the next time.
The oatmeal crust was pretty successful and starting the chicken out in the pan helped the meat retain all its juices throughout the cooking process.

I kept the sides simple, opting for mixed vegetables and biscuits and creating a country-style illusion.

Thursday, May 6, 2010

Sweet and Sour Chicken with Cashews

Short cuts are fun, aren't they? They get us where we want to go faster, on the road and in the kitchen. I'm always looking for a good short cut, so a stir fry recipe that employed frozen chicken nuggets immediately caught my attention. I found it in Real Simple magazine, which, based on its title, seems like a worthwhile publication for beginning chefs.


Ingredients:
1 Cup of White Rice
18 Ounces of Frozen Chicken Nuggets (or thereabouts, I didn't really measure it out)
1/2 Cup of Apricot Preserves
2 Tablespoons of Soy Sauce
2 Tablespoons of Apple Cider Vinegar
2 Teaspoons of Grated Ginger
4 Celery Stalks
1/2 Pound of Snow Peas
1 Chili Pepper
1/2 Cup of Roasted Cashews
2 Scallions

Steps/Analysis:
The rice and chicken nuggets are your first priority since they'll take a good chunk of time to prepare and serve as the foundation of the meal. Depending on the brands of rice and chicken you are using, follow the instructions on the box/bag/package/whatever.

The rice can finish up as you work on everything else, but you should wait until the chicken nuggets are almost finished before getting too ahead of yourself. If you need something to keep your hands busy, you can chop the celery, chili pepper, and scallions and start working on the sauce.
In a mixing bowl, combine the apricot preserves, soy sauce, vinegar, and grated ginger. Stir until thoroughly incorporated and set aside.


When you're ready, put a large pan over Medium/Medium-High heat and pour in enough oil to just coat the bottom. Toss in the celery first, and saute for a couple minutes to soften them up a bit. Then, add the snow peas and chili pepper. Once everything is nice and warmed up, bring the nuggets, cashews, and sauce to the party. Stir or (carefully) toss to coat everything in the sauce.
Finally, bring everything to the table. Sprinkle the chopped scallions over everything.

Serving/Notes:
Spoon big portions of the chicken and vegetables over a nice mound of rice and enjoy. You may want to add a little extra soy sauce, depending on individual taste. Overall, though, the sauce is very pleasant - definitely more sweet than sour.

The somewhat long list of ingredients and directions belie the fact that this is a very quickly prepared meal. I was surprised to find that I had it plated within a half hour or so from starting.

Tuesday, April 27, 2010

Pizza Chronicles: Buffalo Chicken

Since it seems like the majority of my most successful meals occur on top of pizza crust, I thought it might be worthwhile to group these recipes together under a single heading. It also occurs to me that these dinners are most in line with the B.A. Gourmet mentality: feeding college students. To that end, I envision a long line of experimental pizzas in the future. I've already got a few ideas kicking around in my head, but for now let's focus on the dish at hand, buffalo chicken pizza.


Ingredients:
1 Boboli Pizza Crust
1 Package of Purdue Short-Cuts Chicken Breast
2 Stalks of Celery
1/4-1/2 Small Onion
1/4-1/2 Bell Pepper
Shredded Cheese (Mexican Blend)
1/4 Cup of Hot Sauce*
2 Tablespoons of Butter*

Steps/Analysis:
As you can see just from the ingredients list, this recipe is going to have a lot in common with the BBQ chicken pizza I showed you last week. I'm okay with that because the flavors are distinct enough and the two actually compliment each other well when placed on the same table.

At any rate, loyal readers will already be familiar with the first couple steps, making this an especially easy transition to a new meal. Set the oven to 415 degrees and put the bare crust in for about 10 minutes to crisp up.

Dice the onion and pepper and thinly slice the celery stalks. Start all three sauteing over medium heat with a little oil. I like celery in this recipe for a couple reasons. First, it's thematically appropriate to the buffalo chicken theme. Secondly, and, I think, more importantly, celery stands up to heat a lot better than onions or peppers and will retain a lot of its crunch throughout the cooking process. The end result is a pleasing contrast in textures when incorporated with the chicken and cheese.

Next, get to work on the buffalo sauce. In it's essence, buffalo sauce is incredibly simple - butter and hot sauce, melted and mixed together. Use a large, microwave-safe bowl and nuke the two together for a minute or so. I usually eyeball the measurements and adjust the ratio as I see fit during the process, so my buffalo sauce never comes out exactly the same (hence the * in the ingredient list). It's hard to imagine what one would have to do to screw the sauce up, but even if you do it's easy enough to throw together a new batch.


Dump your chicken into the sauce bowl and mix to evenly coat. At this point, the crust should be ready so spread the chicken over it in a single layer. Then, spread the onion/pepper/celery combo on top of that and cover with the shredded cheese.

Place the pie back in the oven for 10-15 minutes, or until the cheese is melted.

Serving/Notes:
Again, it would serve you best to wait a few minutes before cutting into this pizza so everything has a chance to come together and settle.

I'm not a big fan of bleau cheese, but a little bleu cheese salad dressing for topping/dipping is entirely appropriate.

Friday, April 23, 2010

B.A. Gourmet Favorite: BBQ Chicken Pizza

This is the recipe that started it all, the first thing I ever learned to cook for myself in college. I really believe that it's the perfect student meal, based on three outstanding principles. First, it's incredibly easy to make. The ingredient list is minimal and everything is pre-cooked. Second, it's quick. After the first couple times you make it, the entire process shouldn't take much longer than 20 minutes. Third, it's pizza!

BBQ chicken pizza has been a hit with everyone I've made it for. My former roommates have often requested it and gone as far as to purchase the supplies for it. If you are currently in college, do yourself a favor and make this tonight. You won't be disappointed.
Ingredients:
1 Boboli Pizza Crust
1 Package of Purdue Short-Cuts Chicken Breast
Sweet Baby Ray's BBQ Sauce (There's really no reason to ever buy any other brand, trust me)
Shredded Cheese (Mexican Blend)
Optional:
1/4 of an Onion
Small Handful of Sliced Button Mushrooms
Steps/Analysis:
The bare bones recipe is delicious by itself, so, by all means, ignore the onion and mushrooms if you're just getting a handle on the pizza or if you're exceptionally pressed for time. I find, though, that their inclusion really bumps the dish up to a whole different level.
Preheat your oven to 415 degrees. I like to prep the pizza crust by putting it in the oven by itself for about ten minutes. That's going to crisp it up a little bit and make it a firmer foundation for a pile of barbecue goodness to rest upon.
Dice the onion and give the mushrooms a rough chop. Saute together in a little olive oil until the onions are a golden brown and set aside.
In a bowl, deposit your chicken and douse it with the Sweet Baby Ray's. Mix with a fork until each piece has a nice layer of sauce. (When you get good enough, I've found it's actually possible to complete this step right on the pizza crust, so you won't even have to clean a bowl afterwards.)
You can spread the chicken over the crust at this point, but I like to add a base coat of barbecue sauce first. There's no reason to skimp. With your chicken in place, you can spoon the onions and mushrooms on top and then cover everything with fistfuls of shredded cheese.
Place the pizza on a baking dish or pizza stone and return to the oven for 10-15 minutes or until the cheese is nice and melty.
Serving/Notes:
Fight the urge to immediately cut the pie into slices. If you wait a few minutes for everything to set up, the process is going to be much easier and less messy. I like a little hot sauce on my slice, but that's true of just about everything I cook, so suit yourself.
This dish reheats incredibly well the next day, too. As a matter of fact, I think it's pretty tasty cold, out of the fridge as a midnight snack. There's no bad way or time to eat it.
Once you have this basic recipe down, it's easy to play around with it and make all kinds of interesting pizzas. You might remember the Mexican Pizza I wrote about some weeks ago. I've also done a Buffalo chicken pizza that rocks my socks off. I plan on sharing that gem with you next week.

Wednesday, April 14, 2010

Chicken Orzo Frattata

This week's post features I recipe I discovered while watching Everyday Italian with Giada De Laurentiis. If you're a college-age male having trouble getting into Food Network programming, I highly recommend this show. Even if you're not into a particular episode's dish, Giada's not too hard on the eyes.


At any rate, chicken orzo frittata incorporates chicken breast and pasta into eggs, making a far more substantial dish than you may think a frittata is capable of. It's quite enough to satisfy even the heartiest of appetites come dinner time. For Giada's original recipe, click here: http://www.foodnetwork.com/recipes/giada-de-laurentiis/chicken-and-orzo-frittata-recipe/index.html

My own attempt varies slightly, though I imagine the end product is largely the same.

Ingredients:
7 Eggs
2 Chicken Breasts
3/4 Cup Orzo Pasta
1/2 Cup Ricotta Cheese
4-8 Scallions
1/3 Cup Roasted Red Peppers
Italian (Flat Leaf) Parsley

Steps/Analysis:
Giada starts off with a pre-roasted chicken. To save a couple bucks, I bought two raw chicken breasts and decided to cook them myself. Trim the breasts of fat and cut in fairly identical strips (roughly the size of a large chicken tender). Place these in a roasting pan that's been hit with a little spray oil and salt and pepper liberally. Cook the breasts in a 375 degree oven for approximately 20 minutes, or until they are white all the way through.
The next item that should be addressed immediately for time is the orzo. There's no big secret to boiling pasta, fortunately. If you follow the directions on the box you should be fine. Don't be afraid to estimate the amount either - that's what I did because I didn't feel like doing much math.
Chop the scallions into small pieces and dice the roasted peppers to approximately the same size. Give the parsley a rough chop. Combine these ingredients in a large mixing bowl with the eggs and ricotta. (Note: Giada's recipe also calls from creme fraiche, but I couldn't find any at my supermarket, so I just increased the cheese ratio to make up for it.)
Drain your pasta and run it under cold water for a minute or two. Cut the chicken into bite-size pieces and allow to cool on a plate for some time. Neither of these ingredients should be hot; if they are, they'll start to curdle the eggs immediately after being introduced to the bowl.
Uniformly incorporate the last ingredients into the egg mixture and pour into a pie pan or baking dish. Place the dish in your 375 degree oven for approximately 35 minutes. (Note: for some reason, Giada's timing seemed to be very off on this step. I found myself taking the pan out, jiggling it, and putting it right back in the oven more than once.) Basically, you want the egg to be firmly set. If it seems a little liquidy it's probably still okay to pull the pan because carry over heat and evaporation will take care of it.
Serving/Notes:
Overall, a very hearty dish. Two slices had me feeling a little uncomfortably full. In hindsight, I would advise you to go easy on the parsley and be sure to chop it thoroughly. Big chunks of it are going to be a little unpleasant to the palate. Other than that, there's not much to it. Salt and pepper to taste and be careful not to burn your mouth.

Wednesday, March 24, 2010

Mediterranean Chicken Paninis

For Christmas, the lady in my life gave my family a panini press. I can no longer imagine life without one. There's no easier way to make a sandwich taste gourmet. I've made breakfast, lunch, and dinner paninis. My latest adventure into the world of toasted sammiches is the Mediterranean Chicken Panini.

Ingredients:
4 Large Pieces of Round Flatbread
2 Packages of Purdue Short-Cuts Sliced Chicken Breasts
1/2 Medium-sized Onion
1 Small Container of Red Pepper Hummus
1 Small Can of Sliced Black Olives
2 Tomatoes
Mozzerella Cheese
Basil

Steps/Analysis:
Start by cutting your onion into thin slices and sauteeing them in a large pan with some olive oil. Before they're quite done, open up your Purdue Short-Cuts and throw them in as well. The sandwiches are going to be pretty thick and you want and you want the end result to be warm and melty, so it's a good idea to take the refrigerator chill off of the chicken.

In the meantime, cut the flatbread rounds in half. Each round is going to make one panini. Also, cut your tomatoes and cheese as thinly as you can manage.

For the basil, I attempted a chiffonade - a knife technique that I've seen on Food Network a few times, but never tried myself. Basically, stack a bunch of basil leaves one on top of the other and roll them up. Then, make small slices across the cylinder. You should have tiny strips of basil, but don't worry too much if your first try at the maneuver isn't too pretty. It's going to be covered in cheese anyway.

Spread the hummus across one flatbread half and sprinkle with olives. Spoon on enough chicken and onions to make a hearty sandwich on top of that. Next, layer on basil and tomato and, finally, the mozzarella cheese. Cover with the second flatbread half and carefully load it into the heated panini press. There should be enough supplies for four sammiches.

Serving:
Though this is a thick, hearty panini, it's not quite enough to make a meal on it's own. I paired it with some Progresso Italian Wedding soup, which complemented things nicely.

When all is said and done, this dinner took me 20 minutes from start to finish. The payoff is definitely worth the minimal time investment and you may even have left overs for lunch the next day.

Wednesday, January 13, 2010

Chicken Marsala: Classy and Easier to Make than You Might Think

Chicken Marsala is the kind of dish I'm used to seeing only on menus of reputable Italian restaurants. As a result, it lodged itself in my brain as one of those dishes I could never hope to make myself. When I discovered how easy the basic recipe is, I thought that someone must be putting me on. Truth be told, the hardest part of this meal was finding Marsala wine in my local liquor store; my eyes are trained to locate drinking wine, not cooking wine.


Ingredients:
Thin-cut Chicken Breasts (as many as you need for the group you're feeding)
1/2 Medium-sized Onion
1/2 Cup Sliced Mushrooms
1/3 Cup Dry Marsala Wine

Steps/Analysis:
Start by putting a large pan over medium heat. Add enough oil to coat the bottom of the pan. Quick aside: I thought it might be a good idea to season the oil with basil and thyme. I experienced a lot of spitting oil throughout the cooking process, but it was difficult for me to determine if that was because of the amount of oil, the herbs, or an improper heat. In any case, it was a nuisance to deal with, but not overly painful or dangerous. I invite comments to let me know where I went wrong.

Cook your chicken breasts for approximately 3-5 minutes per side, depending on thickness. I always cut them open as I go along to make sure there's no pink in the middle. Remove breasts to a dish and cover to keep warm.

Thinly slice your onion and sautee with the mushrooms in the same pan for just a couple minutes. Don't let them get mushy.

Carefully add your Marsala wine and stir up all the goodness stuck to the bottom of your pan. Salt liberally. Heat for a few minutes before putting your chicken back in the pan. Stir to coat the breasts.
That's it! No lie! I went for the most basic of sides to accompany the chicken: baked potatoes and frozen green beans, both cooked in the microwave.

Notes:
This recipe is good, but a little bland and lifeless as is. In the future, I might bread the chicken first for a little more flavor/texture. Also, it might not be a bad idea to thicken up the sauce a little bit or maybe add some chicken stock to it.

I know I've forced a lot of chicken on you lately (mostly because it's a pretty safe place for a beginning chef to start), but don't worry; my next post will bring something new to the table!

Wednesday, January 6, 2010

Orange Chicken Stir-fry

Recently, I've been eating a lot of beef, mostly steak. I took that into account this past weekend when planning my dinner and decided that I would aim for a simple chicken dish. Since I hadn't yet delved into Asian cuisine, stir-fry seemed a logical choice.


Ingredients:
6 Thin-cut Chicken Breasts
1 Medium-sized Onion
1 Bell Pepper (I actually chose half green and half red for visual appeal)
1 Large Orange
1 Glass (about 8 ounces) of Orange Juice
1/2 Cup Rice Wine Vinegar
1/2 Cup Salsa (strange, I know, but stick with me for now)
1/2 Cup Brown Sugar
1 Tablespoon Soy Sauce
1 Tablespoon Corn Starch
White Rice


Steps/Analysis:
Cut the chicken breasts into roughly bite-size pieces. Chop onion and pepper into similar size strips. Cook in a large pan with enough oil to coat the bottom over medium-high heat. Once the chicken is cooked through the center (do yourself a favor and cut the largest one you can find open to check, don't guess) remove from pan and cover with foil to keep warm.


In a bowl, combine orange juice, vinegar, salsa, soy sauce, brown sugar, and corn starch. Pour sauce into the same pan, stirring to loosen up any bits and pieces that may have stuck to the bottom. Heat the sauce until it becomes slightly thickened.


At this point, depending on the brand and amount you are cooking, it's probably a good idea to start boiling up your rice. In my case, the rice only took 8-10 minutes once the water came to a boil so this is when I started it.


Peel and chop your orange into bite-size pieces.

Return chicken, onions, peppers and orange pieces, to the now thickened sauce, stirring to coat.


Serving:
Just bring the entire pan to the table with a wide spoon for serving. I put the rice in a separate bowl so that people could plate that up first and pour the chicken and sauce over it.


Notes:
The online stir-fry recipes that I used for reference called for pineapple chunks/juice and tomato sauce instead of orange chunks/juice and salsa. Since I already had all the other ingredients in my house, I took some liberties and made those changes. The result was tasty, but very acidy. Someone with a sensitive stomach or heartburn issues may have trouble with this dinner. In the future, I would try to find something a little basic to even out the sauce's pH a little.

Also, I used a dash of hot sauce on my own plate. Obviously, you should season to taste.

Gourmet Counter